Seite 2 - Қазақ
2 Thank you for choosing us! We hope you are happy with your purchase. If you enjoy our product , please leave your review.If you have any questions or issues, contact us anytime and we will help you as soon as possible:USA: [email protected] / +13159682278 Europe: [email protected] / +494029996807 ...
Seite 3 - Ру; Español; ammer
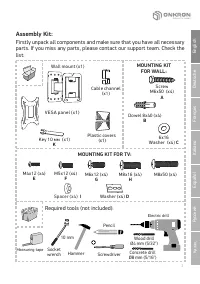
3 Assembly Kit: Firstly unpack all components and make sure that you have all necessary parts. If you miss any parts, please contact our support team. Check the list: Wall mount (x1) Socket wrench Required tools (not included): MOUNTING KIT FOR TV: MOUNTING KIT FOR WALL : Measuring tape Қазақ Ру сск...
Seite 4 - . Wa l l m o u n t i n g; DO NOT drill holes; WA R N I N G; V E S A p a n e l d i s a s s e m b l y; UP
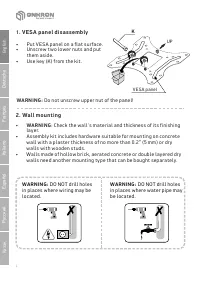
4 Қазақ Ру сский Español Italiano F rançais Deutsche English 2 . Wa l l m o u n t i n g WA R N I N G : DO NOT drill holes in places where wiring may be located. WA R N I N G : DO NOT drill holes in places where water pipe may be located. • WA R N I N G : Check the wall's material and thickness of it...
Seite 5 - Put; losed mounting
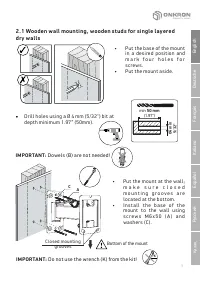
5 • Drill holes using a Ø 4 mm (5/32") bit at depth minimum 1.97” (50mm). I M P O R TA N T: Do not use the wrench (K) from the kit! I M P O R TA N T: Dowels (B) are not needed! Bottom of the mount Қазақ Ру сский Español Italiano F rançais Deutsche English K 2 . 1 Wo o d e n w a l l m o u n t i n...
Seite 6 - C o n c r e t e w a l l m o u n t i n g; Bottom of the mount
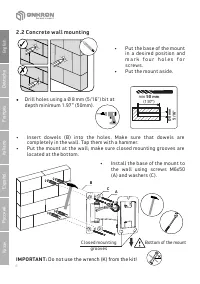
6 I M P O R TA N T: Do not use the wrench (K) from the kit! Қазақ Ру сский Español Italiano F rançais Deutsche English • Drill holes using a Ø 8 mm ( 5 / 16 ") bit at depth minimum 1.97 ” ( 5 0mm). 2 . 2 C o n c r e t e w a l l m o u n t i n g • I n s e r t d o w e l s ( B ) i n t o t h e h o l ...
Seite 7 - . C h o o s e s u i t a b l e b o l t s fo r V E S A p a n e l i n s t a l l a t i o n; Put the TV with the screen down on a smooth and sost sur face.; I n s t a l l a t i o n o f t h e p l a s t i c c o v e r s; Install
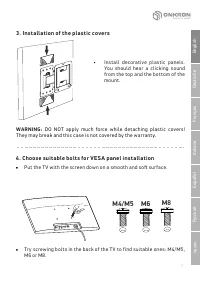
7 • Try screwing bolts in the back of the TV to find suitable ones: M4/M5, M6 or M8. 4 . C h o o s e s u i t a b l e b o l t s fo r V E S A p a n e l i n s t a l l a t i o n • Put the TV with the screen down on a smooth and soſt sur face. Қазақ Ру сский Español Italiano F rançais Deutsche English М4/...
Seite 8 - Installation with spacers (TVs with a rounded back panel or; o r
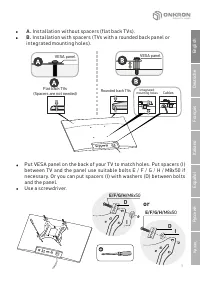
9 • A . Installation without spacers (flat back TVs). • B . Installation with spacers (TVs with a rounded back panel or integrated mounting holes). VESA panel Flat back TVs (Spacers are not needed) Integrated mounting holes Rounded back TVs VESA panel Cables Қазақ Ру сский Español Italiano F rançais...
Seite 9 - . T V m o u n t i n g; ll; Tighten; TV
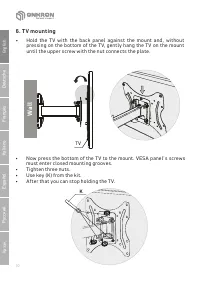
10 Қазақ Ру сский Español Italiano F rançais Deutsche English 6 . T V m o u n t i n g • Hold the TV with the back panel against the mount and, without pressing on the bottom of the TV, gently hang the TV on the mount until the upper screw with the nut connects the plate. K W a ll • Now press the bot...
Seite 10 - C a b l e m a n a g e m e n t; Route the wires into the bracket cable channel.; Set desirable position of the mount.; Nut; The mount features swiveling both sides up to; . A d j u s t m e n t s o f t h e m o u n t; Сable channel
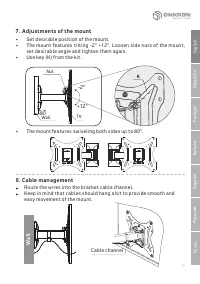
11 Қазақ Ру сский Español Italiano F rançais Deutsche English 8 . C a b l e m a n a g e m e n t • Route the wires into the bracket cable channel. • Keep in mind that cables should hang a bit to provide smooth and easy movement of the mount. W a ll • Set desirable position of the mount. • The mount f...
Seite 11 - BEDIENUNG
12 Danke, dass Sie uns gewählt haben! Wir hoffen, dass Sie mit dem Kauf zufrieden sind. Wenn Sie unser Produkt mögen, lassen Sie bitte Ihr Feedback.Wenn Sie irgendwelche Fragen oder Probleme haben, dann können Sie uns jederzeit kontaktieren und wir werden Ihnen helfen:USA: [email protected] / +131596...
Seite 12 - BAUSATZ; Ratsche; ZUSAMMENSETZUNG DER MONTAGE ZUM FERNSEHER; Empfohlene Werkzeuge, die nicht im Lieferumfang enthalten sind:; Ø mm; mm; Bushse; Halterung
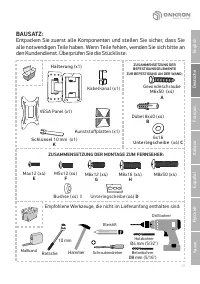
13 BAUSATZ : Entpacken Sie zuerst alle Komponenten und stellen Sie sicher, dass Sie alle notwendigen Teile haben. Wenn Teile fehlen, wenden Sie sich bitte an den Kundendienst. Überprüfen Sie die Stückliste: Ratsche H ammer ZUSAMMENSETZUNG DER MONTAGE ZUM FERNSEHER : Bleistiſt Schraubendreher Empfohle...
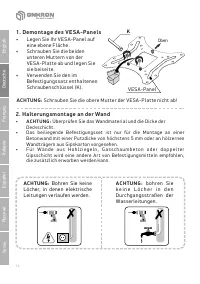
Seite 13 - H a l t e r u n g s m o n t a g e a n d e r Wa n d; Bohren Sie keine; Überprüfen Sie das Wandmaterial und die Dicke der; D e m o n t a g e; Schrauben Sie die obere Mutter der VESA-Platte nicht ab!; Oben
14 Қазақ Ру сский Español Italiano F rançais Deutsche English 2 . H a l t e r u n g s m o n t a g e a n d e r Wa n d A C H T U N G : Bohren Sie keine Löcher, in denen elektrische Leitungen verlaufen werden. A C H T U N G : b o h r e n S i e k e i n e L ö c h e r i n d e n D u r c h g a n g s s t r a...
Seite 14 - H a l t e r u n g s m o n t a g e a n d i e H o l z w a n d , d e n H o l z t r ä g e r f ü r; Geschlossene
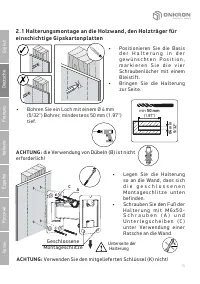
15 Қазақ Ру сский Español Italiano F rançais Deutsche English • Bohren Sie ein Loch mit einem Ø 4 mm (5/32") Bohrer, mindestens 50 mm (1.97") tief. A C H T U N G : Verwenden Sie den mitgelieferten Schlüssel (K) nicht! K A C H T U N G : die Verwendung von Dübeln (B) ist nicht er forderlich! 2...
Seite 15 - H a l t e r u n g s m o n t a g e
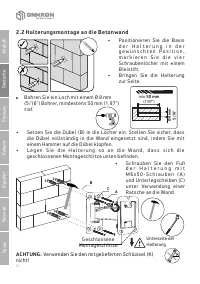
16 • Bohren Sie ein Loch mit einem Ø 8 mm (5/16") Bohrer, mindestens 50 mm (1.97") tief. Қазақ Ру сский Español Italiano F rançais Deutsche English 2 . 2 H a l t e r u n g s m o n t a g e a n d i e B e t o n w a n d • Setzen Sie die Dübel (B) in die Löcher ein. Stellen Sie sicher, dass die D...
Seite 16 - A u s w a h l v o n T V- S c h r a u b e n z u r I n s t a l l a t i o n d e s V E S A - Pa n e l s; M o n t a g e d e r d e k o r a t i v e n K u n s t s t o f f a u s k l e i d u n g e n; Die Anwendung von übermäßiger Gewalt kann zum Bruch der
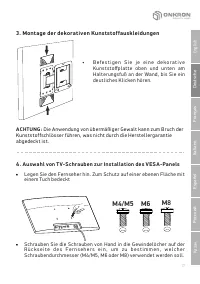
17 Қазақ Ру сский Español Italiano F rançais Deutsche English • Schrauben Sie die Schrauben von Hand in die Gewindelöcher auf der R ü c k s e i t e d e s F e r n s e h e r s e i n , u m z u b e s t i m m e n , w e l c h e r Schraubendurchmesser (M4/M5, M6 oder M8) verwendet werden soll. М4/М5 М6 М8 ...
Seite 17 - Oberteil; M o n t a g e d e s V E S A - Pa n e l s z u d e m Fe r n s e h e r
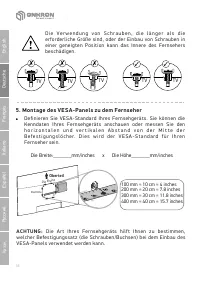
18 A C H T U N G : D i e A r t I h r e s Fe r n s e h g e r ä t s h i l f t I h n e n z u b e s t i m m e n , welcher Befestigungssatz (die Schrauben/Buchsen) bei dem Einbau des VESA-Panels verwendet werden kann. 100 mm = 10 cm = 4 inches 200 mm = 20 cm = 7.8 inches 300 mm = 3 0 cm = 11.8 inches 400...
Seite 18 - D i e O p t i o n f ü r d i e I n s t a l l a t i o n m i t d e r V e r w e n d u n g v o n d e n; o d e r; S c h r a u b e n o d e r; Verwenden Sie einen Schraubendreher.
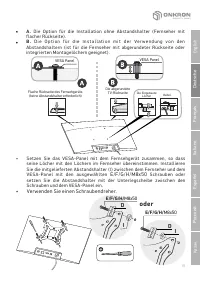
19 • A . Die Option für die Installation ohne Abstandshalter (Fernseher mit flacher Rückseite). • B . D i e O p t i o n f ü r d i e I n s t a l l a t i o n m i t d e r V e r w e n d u n g v o n d e n Abstandshaltern (ist für die Fernseher mit abgerundeter Rückseite oder integrierten Montagelöchern g...
Seite 19 - M o n t a g e d e s Fe r n s e h e r s a n d i e H a l t e r u n g; Ziehen Sie die Haltemuttern an drei Stellen fest.; Fernsehgerät
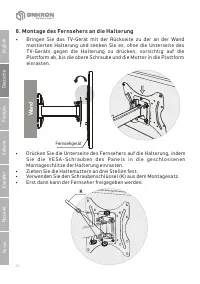
20 Қазақ Ру сский Español Italiano F rançais Deutsche English 6 . M o n t a g e d e s Fe r n s e h e r s a n d i e H a l t e r u n g • Bringen Sie das TV-Gerät mit der Rückseite zu der an der Wand montierten Halterung und senken Sie es, ohne die Unterseite des T V- G e r ä t s g e g e n d i e H a l ...
Seite 20 - . Ve r l e g u n g; Verlegen Sie die Drähte in den Kabelkanal der Halterung.; and; Stellen Sie die gewünschte Position der Halterung ein.; E i n s t e l l u n g d e r H a l t e r u n g s p o s i t i o n; Kabelkanal; Nuss
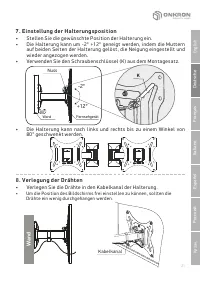
21 Қазақ Ру сский Español Italiano F rançais Deutsche English 8 . Ve r l e g u n g d e r D r ä h t e n • Verlegen Sie die Drähte in den Kabelkanal der Halterung. • Um die Position des Bildschirms frei einstellen zu können, sollten die Drähte ein wenig durchgehangen werden. W and • Stellen Sie die ge...
Seite 21 - Merci de nous avoir choisis!
22 Қазақ Ру сский Español Italiano F rançais Deutsche English Merci de nous avoir choisis! Nous espérons que vous êtes satisfait de votre achat. Si vous avez aimé notre produit, veuillez laisser vos commentaires.Si vous avez des questions ou des difficultés, n'hésitez pas à nous contacter:Etats-Unis: ...
Seite 22 - L' i n s t a l l a t i o n d u s u p p o r t a u m u r; n e p e r c e z p a s d e; L e d é m o n t a g e d u p a n n e a u V E S A; ne dévissez pas l'écrou supérieur du panneau VESA!; Haut
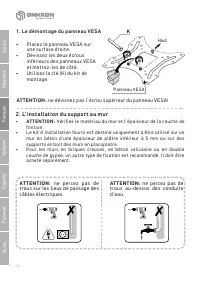
24 Panneau VESA Қазақ Ру сский Español Italiano F rançais Deutsche English 2 . L' i n s t a l l a t i o n d u s u p p o r t a u m u r AT T E N T I O N : n e p e r c e z p a s d e trous sur les lieux de passage des câbles électriques. AT T E N T I O N : ne percez pas de trous au-dessus des conduite d...
Seite 23 - Percez un trou avec une mèche de Ø; L' i n s t a l l a t i o n d u s u p p o r t s u r u n m u r e n b é t o n; Mettez le support sur le côté.
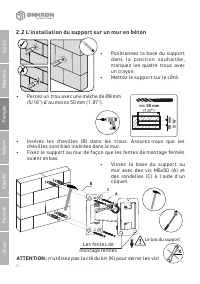
26 Қазақ Ру сский Español Italiano F rançais Deutsche English • Percez un trou avec une mèche de Ø 8 mm ( 5 / 16 ") d'au moins 50 mm ( 1 . 97 "). 2 . 2 L' i n s t a l l a t i o n d u s u p p o r t s u r u n m u r e n b é t o n • Positionnez la base du support d a n s l a p o s i t i o n s o ...
Seite 24 - Grazie per averci scelto!; DI
32 Қазақ Ру сский Español Italiano F rançais Deutsche English Grazie per averci scelto! Ci auguriamo che lei sara soddisfatto del suo acquisto. Se ti piace il nostro prodotto, lascia la tua recensione.Se hai domande o problemi, puoi contattarci in qualsiasi momento e ti aiuteremo:USA: [email protect...
Seite 25 - ВНИМАНИЕ; Не требует обязательной сертификации.; ОБСЛУЖИВАНИЕ
52 Қазақ Ру сский Español Italiano F rançais Deutsche English Спасибо, что выбрали нас! Мы надеемся, что Вы довольны покупкой. Если Вам понравился наш продукт, пожалуйста, оставьте Ваш отзыв.Если у Вас возникли вопросы или какие-либо проблемы, то Вы можете связаться с нами в любое время, и мы Вам по...
Seite 26 - . Ус та н о в к а к р о н ш те й н а н а с те н у; Н е с в е р л и т е; . Ра з б о р к а V E S A п а н е л и; П о л о ж и те; Верх
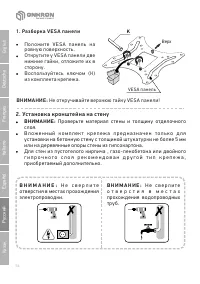
54 Қазақ Ру сский Español Italiano F rançais Deutsche English 2 . Ус та н о в к а к р о н ш те й н а н а с те н у В Н И М А Н И Е : Н е с в е р л и т е отверстия в местах прохождения электропроводки. В Н И М А Н И Е : Н е с в е р л и т е о т в е р с т и я в м е с т а х прохождения водопроводных труб...
Seite 27 - PAGE; rançais; SEITE; English
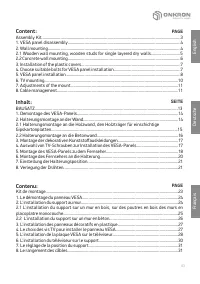
63 PAGE F rançais Contenu: Kit de montage ...............................................................................................................................23 1. Le démontage du panneau VESA ............................................................................................24 2...